Rug No.1

My first woven rug came together rather fast, from six old shirts of Jeff’s (one which I made for him years ago, and five LLBean shirts) made custom for a space in our bedroom in front of an old dresser which was given to us by a weaver (hi B!). The rug was woven on my 48″ rigid heddle loom, with the Freedom Roller attached, and I used a temple but kept it back a few inches from the fell so I didn’t whack it with the Schacht weighted beater.

Its been raining steadily for a few days, and I hemmed the rug sitting at the window, in the low light of the afternoon, admiring the Autumn color outside with the black oaks that have completely turned gold.

I am really surprised I could weave an *actual* rug on a rigid heddle loom! The rug is 28×50 inches, and I figure I could have had double the length with the Freedom Roller attachment; I reckon I could warp up to 48″ wide, so in theory, I could make a monster rug of 4×8 feet. After I finished weaving it I hemmed the edges to the under side, and carefully took the labels off and chose one to sew on the hem for a little artful whimsy . . .

Juno was the warping and cutting supervisor!

♣   Weaving Notes  ♣

General Notes: I had to get around the fact that the rug is not made with a proper floor loom, with a heavy swinging beating reed, and so I had to beat hard along each weft with the Schacht weighted beater, but the end result was good enough. I thought of a clever way of cutting long strips; figured since the strips of cut fabric are getting scrunched into the warp anyway, it does not matter if they are on the bias or on the grain, I cut about 2″ wide strips, starting at the bottom, between button bands, following the shape of the shirt tails, zig-zag cutting back and forth, using up as much of the shirt as possible, and very little was cut on the grain. The sleeves were mostly spiral cut. When about 1.5″ from the button band I stopped, then from beneath cut a wide turn back the other direction over of the previous cut, snipping across side seams as they come. I was not particularly neat with the cutting either. I cut all the ends angled, and overlapped the beveled ends instead of sewing edges together, which would be way more work.  I wove one shirt completely before starting the next, in segments rather than stripes, so we could recognize the old beloved shirts in their sequence.

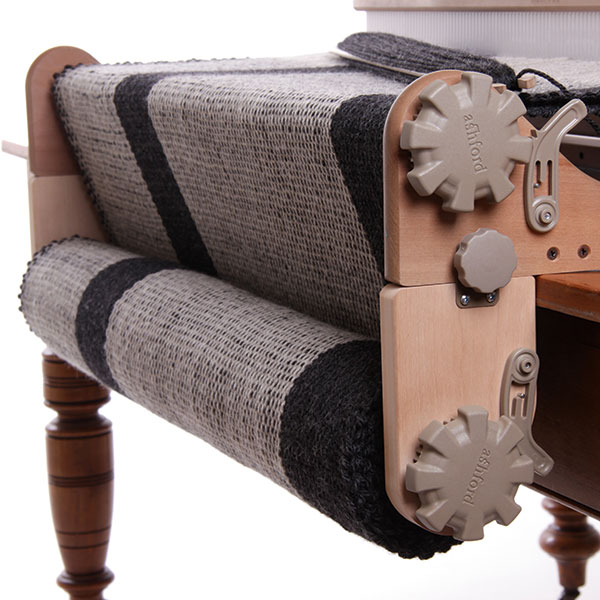
Additionally, the rug is fairly sturdy and thick and the woven “cloth” builds up fast on the cloth beam, so the Freedom Roller (Ashford’s add-on cloth beam for their rigid heddle looms) is absolutely essential in my opinion to weave a rag rug that is thick and substantial, as is the weighted beater. But perhaps the most essential thing that I overlooked (never again!) is the importance of using warping yarn that can withstand the punishment of the hard beating. 

  • Yarn: Maurice Brassard 8/2 cotton, double threaded (2 in hole, and 2 in slot) emulating 8/4 warp yarn. Approx 80″ from apron rod to pegs. Should have bought heavier warp yarn and waited for it to arrive before starting the rug! 
  • Weft: Cotton flannel strips, about 2″ wide, taken from old shirts. Beginning and end 3″ same as warp, woven wide enough to make a turned hem below the rug. 
  • Loom: Ashford 48″ Rigid Heddle Loom (the beast!) with Freedom Roller attachment
  • Number of warp ends: 210, double threaded = 420.
  • Reed: 7.5 dpi (30/10cm) dent rigid heddle reed, about 28″ width in reed.
  • Finished: 1 inch turned hem, sewn against the underside of the rug. No washing/drying. Measurements finished are 28″ x 50″. I planned for 60″ length but made a mistake when measuring warp distance and somehow didn’t factor in the correct amount of loom waste! Gaw!!!  
  • Yardage: Who knows…. 6 shirts using as much as I possibly could. 

Scarf No.9

Hi, its me Abelene.

In the end, it was impossible to photograph, the colors could not be grasped by the camera. Even after trying a hundred shots, in different areas of lighting, only these few worked out. But Jen told me how amazing this one was to be weaving freely with no measured blocks of color, just changing quill bobbins randomly, and she has a lot to say about the whole project in the weaving notes below, so I’ll just smile and wave. I personally think the Marigold Scarf (no.9) is so beautiful, in its deep and rich gold tones, and I wish you could see the colors as they really are, but this photo out of all the many, captures the colors best . . .

♣   Weaving Notes  ♣

Note from Jen: Yes, this project was difficult, and I must confess I am not all that encouraged about dyeing cotton but am gaining perspective in the concept of “slow cloth”. After the many steps of scouring, mordanting, dyeing, then finally washing and rinsing, the actual yarn, and that is before the loom is even warped. I must ask myself is it worth it? I ponder this because I really love weaving, but maybe the added overwhelm from dyeing the cotton yarns first did add a new level of complexity. I have tried indigo, madder, pomegranate and marigold, and in every yarn the results were dull and almost unappealing as the sheen of the undyed mercerized cotton was lost after all the processing through the steps, the luster was gone. I will not give up, I just need a small break, in order to be fresh for learning again. You can see all posts for this project here.

  • Yarn: Yellow , dark gold , green gold overdyed 10/2 yarn (see this post. )
  • Loom: Ashford 16″ rigid heddle loom.
  • Additional tools: I used a temple and the board I rest against the cloth beam to stabilize and lengthen the weaving surface.
  • Warp:  Direct warp set-up, 1 end in every heddle/hole, and 1 in every dent/slot –drawing out from apron rod to peg is approx 110 inches from apron rod to warping peg.
  • Number of warp ends: 239.
  • Reed: 15 dent rigid heddle 15.5″ in reed. (The loom says 16″ weaving width, but there is only the capacity in the reed for 15.5″ .
  • Sett on loom: Warp = 15 epi,  weft = 15 ppi
  • Sett after finishing: Warp 16 epi, and weft 16-18 ppi.
  • Color Pattern: Warp =  random pattern.
  • Finished: 3 inch twisted fringe, then washed and dried in machine, then pressed. Measures 78″ long (not including fringe) and 14″ wide, and weighs 135 g. 
  • Yardage:  Total yardage used is approx 1250 y, figured from weight of finished piece and not including loom waste.
  • Note to self, recipient was eventually Camille, although it was intended for Nina.

marigold

I have just put together my little Ashford 16-inch rigid heddle loom. It arrived yesterday, and immediately after I rubbed all the wood pieces with butcher block wax, then this morning I assembled it with excitement, as my mind filled with visions as to what beautiful and interesting textiles will be woven on it. There is no denying these rigid heddle looms are addictive and tend to fill as much available space in one’s life as there is ambition to weave on them.

I know, I know, I already have several other looms, but I decided to get this little one anyway, and it really wasn’t at all that expensive. I just wanted a simple small loom to weave simple plain weave scarves only, a modest little destination loom for my modest little dye experiments, natural or commercial dyes, I’m no snob about it.

This first project is cotton dyed with natural marigold flower petals! The remarkable thing about this project is that I used a shortcut to a varied colorway by simply over-dying different shades of neutral tones, all in one dye bath of marigold flower petals. Plain and simple, the way I like to do things. I’ve written detailed dye notes below and stay tuned for a finished weaving coming up in the territory ahead.

♣   Dye Notes ♣

I got back to the dye pot, determined to have an easier time of it, working over all my beginner’s doubt with a fine-tooth comb. I hovered over the instructions nervously, double and triple checked every step before commencing, and yet still I was having to improvise and make adjustments. Scoured, check! Mordanted, check! Dyed, check! One hour devoted to each step, not including the tea over-dye. I was quite exhausted by the end of it all.

I started out with four colors of varying tones and hues of neutral, wrongly assumed I would have four colors over overdyed yarns, and ended up with only two; the grey was a darker shade, but all the others looked almost the same. After all was rinsed and hanging dry on the clothesline, I quick made literal quart sized pot of strong tea of Yorkshire Red, basically a tannin bath, and in went the lightest of the yellow shades which shifted immediately to a rusty brownish orange, absolutely beautiful! Love the way nothing can be predictable, and I am ready to make a panic decision at any moment. Now that all is dried the result is three slightly different shades of marigold, and what I figure is the spectrum of the marigold flower, from yellow to deep gold to greyish yellow green.

  • Yarn: Valley Yarns 10/2 mercerized cotton in colors: Natural (8176), Autumn Blonde (1405), Shell (7503), and Frost Gray (8798).
    • All were scoured together for 1 hour with soda ash.
    • All were mordanted together for 1 hour with Alum Acetate.
    • All were overdyed in same bath with marigold petals, but colors Natural and possibly some of the others were again overdyed in Yorkshire Red tea, for about 6 minutes in the pressure cooker on low pressure, for just a kiss of color to deepen the yellow, which turned to a deeper gold.
    • The marigold overdyed Grey yarn appears a deeper greenish yellow, a wonderful surprise! There must have been a little blue in the grey.
  • What I will do differently next time: I will use distinct different values of neutrals, such as natural or white, light grey, and medium-dark grey. The Natural, Autumn Blonde, and Shell colors may have been different hues very slightly but all the same very light value, so after overdyed and dry, all looked the same, I could not tell the difference — I should have labeled the yarns!

Ikat No. 1

This piece is my first attempt at ikat, even though it is only a simple random ikat. I saw a short film on Japanese Kasuri, and wanted to try working with ikat, posted in Knotty. But natural dyeing to me is tricksome, particularly dying cellulose fibers like cotton and linen, and particularly indigo which works in an alkaline solution, which cellulose fibers require. To add, alkalinity is the enemy of wool, which is the only fiber I have significant experience with and possibly the most desire to work colors into. Dying cellulose fibers, such as commercial weaving yarns, involve scouring extremely well, mordanting properly, dying, then neutralizing and rinsing till the cows come home … requiring many chemical ingredients and meticulous measured steps which are very complicated and a lot of work. And if scouring is not done properly a thing happens called “crocking”, where instead of the dye imbedding fully into the yarn, some of it hangs out on the surface ready to rub off on things and ruin them … on to your favorite weaving equipment, on to the clothes worn while weaving, and after being washed the dye gets into the other colors in the weaving itself, which happened to this piece regretfully.

I wish I knew this about the pH issues and limitations before jumping in, and think at this point I need to put the dyes away for while and release myself from self-imposed expectations of dye mastery! I have learned that both commercial dyes and natural dyes have their pros and cons, and I will likely go back to my old favorite reliable powdered Jacquard dye with wools, which are protein fibers, for it needs only a splash of vinegar in the dye bath, a quick scalding, and the dyebath exhausts beautifully if done correctly. Maybe I will again try ikat weaving with wool and Jacquard dyes next.

Going forward, and I have asked myself this: Why spend so much time, money, and resources on the things I am a rank beginner at, while falling behind and not bringing to fruition the things I have a bit of and skill (dare I say talent) with, and really should aspire to become better at? There are a lot of things I want to do, but at this point in my life, I must narrow down the possibilities, eliminating distractions is essential.

♣   Weaving Notes  ♣

There are no technical weaving notes in this post, but I want to document something remarkable I discovered for rigid heddle weaving ! When I was more than halfway through the weaving, and the front cloth beam was getting pretty packed with woven fabric and cardboard I found the cloth beam to have a certain amount of “squish”, the selvedges conforming to the curve of the cloth winding on irregularly, and not really producing a perfectly flat weave. This I assume is one of the things about rigid heddle weaving, the cloth beam builds cloth and as it does the woven cloth distorts in shape, as well as effects the stability of the tension.

I had an idea of propping a piece of wood against the wound cloth on the cloth beam, right at the edge, creating a sort of breast beam setting on top of the wound cloth. I found a piece of board which I had used it for separating the shed wider in backstrap weaving, so I positioned it on the cloth beam so that when I tightened the warp, the tension held it in place, creating a very stabilized and firm straight edge for the weaving, and I found I gained quite a bit of extra space on the weaving too, especially for the temple. The more cloth on the beam, the further back the stabilizing board it sits, creating a longer weaving area in front of the reed! I am going to explore this idea in the future, for I am very excited!

Note to self, recipient was eventually Rosanna.

Out in Autumn

Walking out in Autumn with Juno this morning, up to the precipice, overlooking a beautiful fog in the valley below, and cool enough at 8:30 in the morning. Again, I used my phone, which I keep in a little hip pack whenever I go hiking now, but so disappointed the phone’s photos portray everything hazy and colorless (next time I absolutely must bring my camera!) but I did get some photos of the top of the mountain, and on the way back down. I’m making a good effort with Juno to be out as much as possible in my favorite time of year, cherishing the landscape, although heat still hovering in waves, dusty, dry, and thirsty, hoping for the rains to start soon, and give it a good drink!

Sun Into Libra

Sun has gone into Libra, and now it is the Autumn equinox. This photo has become my tradition for years now, capturing the most magical time of day on the most magical day of the year, when the sinking sun throws light up against the rafters, and the beams reflect a glow, yet each year it is a little different. A time of transition into soothing cooler days with rain on its way, it marks a happy time of excitement. Wishing a happy equinox to all!

Scarf No.8

Hi, its me Abelene.

The news around here is that Jen finished scarf no. 8, and not only that, but also she says she is finished the 20/2 ulltra fine cotton series, at least for a while. Time to move on. This project is unique from the others because she used direct warping method on the 8 shaft table loom — do read Jen’s note down in the Weaving Notes explaining things, and see all the photos. We, the crew of inanimate objects; a chatty mannequin, all of the looms, Señor Mirando (mirror), ladder, chairs, old wooden ironing board, little antique folding ruler, et al — we ALL respect that this double threading thing is a big deal to Jen, but she’s losing her mind a bit, attempting to avoid convention. We, the crew, are happy to be able to work together photographing beneath the rafters, with beautiful draping hand weavings, in the afternoon light, but we aren’t sure what Jen intends to do now being finished with “the series”. She has been spending time making dye concoctions with powdered extracts of indigo, madder, and pomegranate rinds, and so we think her next thing might have something to do with that, which no doubt in my mind will result in another beautiful drapey thing!

Ta ta, Abelene & The Crew

♣   Weaving Notes  ♣

Note from Jen: For this piece I tried the easy direct warping double threaded through the heddles on the table loom, so was inventing a method for myself, as so far I have only have done this on the rigid heddle loom with Scarf no.7. Take a look at the photos in the weaving notes below and you’ll see that this is not conventional, and I’m only grateful there are no weaving police around. For the weavers who are reading, I’m sharing my weaving notes and detailed warping photos below . . .

  • Yarn: 20/2 mercerized perle cotton, 8400yds / 1 lb, Maurice Brassard, in colors Natural (P-100), and Flax (P-5104).
  • Loom: Ashford 8shaft Table Loom, straight draw threading for plain weave, lifting pairs of odds & evens (1&3, and 2&4)
  • Warping method:  Tested an easy direct warp method, back to front; double threading from back apron rod through reed and heddles, then to peg. Wound on to back beam and finally tied off on to front for weaving. Warp length is approx 130 inches from apron rod to warping peg.
  • Number of warp ends: 640 max plus 4 extra at each selvedge = 644 ends
  • Reed: 16 dent reed, 2 ends in each dent and 2 ends in each heddle (except for selvedges 4 ends each)
  • Width in reed: forgot to measure.
  • Sett on loom: forgot to measure.
  • Selvedges: I did not add extra ends to the selvedges, but did use a temple.
  • Sett after finishing: Warp 36 epi, and weft 26 ppi.
  • Color Pattern Warp: [32 dents of Natural, 32 of Flax] rep blocks across reed until measures 20″
  • Pattern Weft: Wound on to a 30″ stick shuttle for each color as follows: [30 wraps Natural, 30 wraps Flax] repeating sequence.
  • Finished: 1/4 inch turned hem, then washed and dried in machine, then pressed, measuring 81″ long and 18″ wide, and weighs 150g. 
  • Yardage:  Total yardage used for finished piece = 2780y, figured from weight of finished piece and not including loom waste.
  • What I will do differently next time: Raise up the harnesses to warp, thread and sleigh, I found I had to crouch down unnecessarily before I realized! Also I will group in 1″ bundles, having mistakenly miscalculated 8 groups of 4 harnesses, was actually 2″. EACH GROUP OF 4 harnesses is 1/4″. A group of all 8 harnesses will be 1/2″
  • Recipient: Sorcha

steptember

Today is the 1st of Step-tember, and a daily walking routine, so Juno and I walked to the top of the mountain, she running in circles around me. Phone photos don’t do justice to the scenery (so lazy these days, I didn’t bring my camera) but they document the event, so it’s all good. Steptember and Walktober are the months about walking-into-autumn, making up for the lazy days of summer I spent indoors out of the heat. Now, counting down the days to the Autumnal Equinox, three weeks from today!

Dyery

I’ve been trying out some natural dyes from my new natural dye kit, and decided to start a dye diary — a DYERY — on my blog, to keep track of successes, failures need not be mentioned. On the summer solstice I bought myself the Earthhues Color Collection Kit which promises to be completely safe and I love the motto on the instruction booklet “What comes from the earth shall not harm the earth” ~~ I’m on board! The kit includes everything needed for one or two indigo vats as well as a dozen other color dye extracts, and mordants, plus color shifters, for both protein fibers as well as cellulose fibers, really quite a value when you open the box and it is packed with pouches and jars and a booklet too. I want to have my basic primary natural colors which is indigo, madder, and weld, but wanted to explore with some neutral and golden tones too, so these were my first two experiments all using 10/2 mercerized cotton for weaving …

Indigo: The dye used indigo extract powder, lye powder to make the vat alkaline and thiourea dioxide to reduce the oxygen in the bath — very fast — but the chemicals did not smell at all pleasant. I think next indigo dye vat I will try the well-known “1-2-3 fructose vat” which uses powdered food-grade lime (calcium hydroxide) to make the vat alkaline and fructose powder to reduce the oxygen. The color striations are from when I tied some warps for ikat that I posted in Knotty after being very inspired by the Japanese ikat video. I hope to try my first ikat weaving very soon, but that will be a different post. As I tied off the ikat warps 5 inches center-to-center, I figured I could go ahead and wind into a ball and align the ikat patterning on the loom when I weave.

Madder, Weld, Pomegranite, and mix of Wattle & Quebracho: Four at once, after scouring and then mordanting the cotton fiber with aluminum acetate solution. The four dyes simmered in separate pint jars in a huge electric 12 quart instant pot that I got just for dying, scouring, and mordanting with, and can set different sized jars inside of the heating water, which makes a very clean and flexible heat source. I don’t know which dye jars were the pomegranite and waddle/quebracho as I didn’t label the dye jars, a bad oversight out of inexperience to run up to the house and get pen to mark the jars with writing on rubberbands ~ next time for sure!

♣   Dye Notes  ♣

  • Indigo: No need to mordant, and I forgot to scour. I didn’t weigh the parts, just used the vat recipe in the booklet which was in tsp/tbsp/cup measures — it really is magic, the blue is a beautiful earthy warm blue, truly a gorgeous blue light, medium, or dark shades.
  • Madder (15% wof “weight of fiber”): Came out exactly how I predicted, a beautiful warm brick red. In future if I want it darker, I think I’ll just overdye a grey or brown yarn or wool, and that should be perfect.
  • Weld (15% wof): Came out neon bright yellow, and ended up borrowing little bits of dye out of the other jars to tone it down. In future, I’ll only use weld in combo with other dyes or overdye another color like grey or brown, should be lovely.
  • Pomegranite (15% wof): What I suspect was the lovely gold, bottom left, but I can’t be sure. Once I find out for sure, I will repeat this percentage of wof because its a perfect gold.
  • Wattle & Quebracho (12% & 3% wof): What I suspect is the rosy beige the booklet recipe listed.

cioccolato con nocciole

I have been doing experiments in chocolate, because I’m so in love with the taste of hazelnuts and chocolate, as the Italian invention gianduja, but this is my own rustic variation of it. I will tell you quite personally and revealing, the tastes that belong together, cioccolato con nocciole e caffè (chocolate with hazelnuts and coffee) , in the afternoon satisfies a deep and intimate craving from within me, so I strive on to perfect it. The real gianduja is made quite differently, with but I aspire to first find a balance of milk chocolate that is barely sweet, and by adding finely ground hazelnut paste gives it another dimension, soft and velvety, so mild, so meant to be accompanied by a little cup of rich coffee ~~ really, the finest pleasure of a moment!

♣   Cooking Notes  ♣

  • In a mortar and pestle I ground toasted hazelnuts — it took a while and I could have ground the paste longer, refining it much more by releasing the oils out of the nut solids better, but impatience won over, and I sacrificed my nut paste too early to the melting chocolate.
  • My chocolate mix is an easy method to get a barely sweet milk chocolate, without having to purchase a conching machine to mix the separate basic ingredients (like cacao powder, milk powder, cocoa butter, etc) But instead I blend pure white chocolate (with cocoa butter, not palm oil) and unsweetened cacao paste wafers, melted in a bowl over barely simmering water. 
  • I wasn’t sure about the chocolate’s ability to solidify after mixing in such an amount of hazelnut paste, so I poured it over a bed of whole hazelnuts to give it marvelous success anyway, a soft bite into a load of crunchy hazelnuts! I just keep the broken pieces of the hazelnut chocolate in a jar in the freezer which is great at least in the summertime.
  • I will be refining my gianduja further along, perhaps molding it into classic gianduiotti shapes, we’ll just have to see where it takes me. (( click 1st image to go to slideshow ))

Thought I’d post this one too , just the milk chocolate mix without hazelnut paste mixed in, poured over the toasted hazelnuts, mixed in the dish a little before cooling and breaking up . . .

.

Knotty

Ikat is on my mind in recent days. I bought the book, watched the videos, and naturally soon thereafter I would want to go down to the tiny (dye) house where my indigo and madder are waiting patiently for me, and start tying knots!

A lovely artful video on one family’s kasuri making . . .

Another artful video from the same dye house, more extensive footage with no vocal. . .

Scarf No.7

Hi, its me Abelene

I am happy to introduce to you the very latest in Jen’s ultra fine weaving series, and also my new photo shoot companion, Señor Mirando the mirror, who arrived here weeks ago along with a lovely old dresser, the set being a gift from another weaver (thank you Bea!) Handsome and talented at revealing to you the intricate and complex angles of a drape which I simply can not, Mirando promises to show up for the photo shoots along with our hard working crew the ladder and chairs.

The weaving is remarkable, for it is two threads in warp against one thread in weft. Yesterday Jen washed it and hung it out to dry on the line, flapping in the 100F summer heat, and only took less than ten minutes, and barely more than five, because it is so hot outside.

I think it is very beautiful and interesting how the unique weave structure looks, I wonder if there is a name for this, does anybody know? Anyway, Jen is on to something here, and wants to develop this style of quick and easy warping she says, so she’s going to warp another of this kind of weave on my buddy in the closet, the table loom, but with a finer weave, just because it’s worth exploring. I for one am looking forward to having another photo shoot with Señor Mirando & His Dresser, as we’ve all hit it off fabulously.

Ta ta, Abelene

The note from Jen: I’ve been exploring weaving in a series of ultra light 20/2 cotton, this being the fifth in the series, woven on my 20″ Knitters Loom, and even though the weave structure doubles the warp against the weft, it appears to be balanced. I have been wanting to try the easiest method I can think of, which is double threading one reed, with 2 in the heddle/hole, and 2 in the dent/slot, then single weft. This way no rethreading has to be done. I did this kind of warping before (tablecloth) and I really thought it worked out great, less fuss warping meant more time to enjoy the weaving. And just as Abelene reports, I have another one of these I want to weave next, and it will be warped direct on the table loom, a multiple harness loom with heddles, with the same weave structure, but 32 ends per inch warp, 2 through each heddle and 2 through the dent, completely going against tradition. Thankfully there are no weaving police around here, for surely I would be arrested for attempting this. Be sure to click through the photo slideshow below, and now for the weaving notes…

♣   Weaving Notes  ♣

  • Yarn: 20/2 mercerized perle cotton, 8400yds / 1 lb, Maurice Brassard, in color Galaxy Blue,  and Venne in colors Gobelin Blue, Brass, and Golden Brown.
  • Loom: Ashford Knitters Loom 20″.
  • Warping method:  Direct warp method for rigid heddle loom.  Warp length is approx 115 inches from apron rod to warping peg.
  • Reed: 15 dent reed, 2 ends in each dent and 2 ends in each hole. 
  • Width in reed: 18″
  • Sett on loom: Warp = 30 epi and weft = ?? (forgot to measure)
  • Selvedges: Doubled for 4 ends each selvedge and used a temple.
  • Sett after finishing: Warp 34 epi, and weft 17 ppi.
  • Number of warp ends: 560, plus 4 extra at each selvedge = 568 ends
  • Color Pattern Warp:
    1. 15 holes and 15 dents with 2 ends each (30ends) Galaxy Blue, same with Gobelin Blue.
    2. Same with Brass, same with Golden Brown, then again with Brass. 
    3. Repeat step 1 and 2, switching Golden Brown and Brass; twice,  then repeat step 1 only. 280 dents/ 560 ends, plus 4 ends each selvedge, total 568 ends.
  • Color Pattern Weft = wound on to a 30″ stick shuttle for each color as follows: [10 wraps Galaxy blue, 10 wraps Gobelin blue, 10 wraps Brass, 10 wraps Golden Brown] repeating sequence.
  • Finished: 1/4 inch turned hem, machine washed and hang dried, then pressed. Measures 84″ long and 16″ wide and weighs 129g. 
  • Yardage:  Total yardage used for finished piece = 2374y, figured from weight of finished piece and not including loom waste.

Scarf No.6

Hi, its me Abelene

Here is Jens latest weaving in her ultra fine series! She thinks the attention to drape is really emphasized when the weaving is wrapped around something body-shaped, and not necessarily ladder-shaped, as she had been doing earlier, and so I am the designated weaver’s model, and giddy for the thoughtful attention. Besides, Jen says I’m the new It Girl!

I am trying not to take offense to be calling ” it ” but Jen assured me that an “It Girl” is an attractive and engaging young woman, originating from a 1920’s film all about the British upper-class society. Hey, then I am IT for sure! Mostly because I like to be attractive and engaging. Oh, and Jen thought it best to have a format for these weaving posts, where I get to focus on the dazzling visual affect, then afterward she will explain the boring weaverly aspects in a special note about the project below.

Ta ta, Abelene

Note from Jen: I’ve been exploring weaving in a series of ultra light 20/2 cotton, this being the fourth, and the 20 epi woven on the Ashford Table Loom, set up for weaving straight draw (that means using 4 harnesses threaded 1-2-3-4, which in itself, was a completely new and thoroughly difficult experience, with threads doubled through the reed. Gibberish to my knitting colleagues, but to the weavers who might be reading this, they know this is an absolute basic step to learning weaving on multiple shafts. In fact, the weavers who might be reading this will roll their eyes for the fact that I warped it the same direct method as I do rigid heddle looms – direct warp – drawing the warp from the front apron rod through the reed, and around a peg, and then threaded through the heddles as an in-between step before winding it all on to the back warp beam. I improvised with this and subsequently the warp had mistakes, but not willing to get bogged down with them, I wove the piece instead testing gleefully what seemed closest yet to a perfect balanced weave, with just one light tap of the real swinging beater. This project was first in its own series of multiple shaft fine weaving, and so this very exciting!

♣   Weaving Notes  ♣

  • Yarn: 20/2 mercerized perle cotton, 8400yds / 1 lb, Maurice Brassard, in colors; Galaxy Blue (P-112), Light Beige (P-2), and Blanchi (white) (P-101). 
  • Loom: Ashford Table Loom.
  • Warping Method:  Direct warp, using an extra peg so I could get some extra length in the small space (because honestly , this table loom and stand take up a lot of space in the room. 1-2-3-4 straight draw, and 2 threads in every reed dent. Warp length is approx 110 inches from apron rod to warping peg.
  • Number of warp ends: 360, plus 4 additional each selvedge. 368 ends total. 
  • Reed: 10 dent reed, 2 ends through each dent.
  • Width in reed: approx 18″
  • Selvedges: Doubled for 4 ends each selvedge, and used a temple.
  • Sett after finishing: Warp 22 epi, and weft 20 ppi. Still not perfectly balanced, but could be a situation of beating . I think a closer sett for warp would allow me to beat more consistently and get perfect balance, because with a slightly open weave the measuring overall is more difficult because of variations throughout.
  • Color Pattern:   
    • Warp =  [20 slots with 2 ends each slot (40ends) blue, 20 slots with 2 ends each slot (40ends) light beige, 20 slots with 2 ends each slot (40ends) white] repeat. 20 slots with 2 ends each slot (40ends) blue. 
    • Weft = wound on to a 30″ stick shuttle for each color as follows: [30 wraps blue, 30 wraps light beige, 15 wraps blue, 15 wraps light beige] repeating sequence for the length of the warp.
  • Finished: 1/4 inch turned hem, then washed and dried in machine, then pressed, measuring 76″ long and 17″ wide, and weighs 96g. 
  • Yardage:  Total yardage used for finished piece = 1776y, figured from weight of finished piece and not including loom waste.
  • What I will do different next time:  Warp back-to-front, again direct, but with longer warp needed due to the fact that the table loom has more loom waste than the rigid heddle loom, such as a minimum of 120″ from apron rod to peg for 80″ finished scarf.  Also I need to better organize heddles before attempting to thread, so mistakes don’t happen as easily. I will tie off bundles of 1″ in groups according to epi.