Chasing Sheep

It was the early morning of a hot August day when I set out with my camera and my Summer Fields Cardigan, the one I had just sewn buttons on at dawn and met the sun as it was ascending from the valley, before I had even blocked the sweater. I was out photographing in the field, hanging the sweater on a rusty old fence post at the southeast corner of the high vineyard, just a short distance from our house. Suddenly, two ewes ran past me with their lambs, undoubtedly escaping the herd to find tastier grazing further up the ridge.

As I was setting up the photo, next came down from the high vineyard running after them, a girlish woman with wise eyes, a patient smile, a straw hat, and a long thick braid the color of the dried summer field. She ran past me … well, almost past … but not without introducing herself first as Sarah, with a handshake. Believe me the coincidence of the situation was remarkable; she was chasing sheep, and I was hanging a handspun, handknit wool sweater on a fence post. That was how we met, completely oblivious at the time to the imminence of she and I becoming teacher, prodigy, and friends.

Sarah lives on the mountain and works very near our house, so I see her whenever she has an hour to spare to stop by and weave or spin, sharing a cup of fresh ginger chai after she is done at the sheepfold, working on the projects that she wants to do, and over time I see her to the finish. On occasion a few from the herd get loose, and Juno gets to chasing them, then I call Sarah to tell her the details of where they went. Although recently they have been more settled in their seasonal fenced areas out of the vineyards while the vines are producing, protected by a huge guardian dog named Tucker whom Juno is absolutely enamored with.

In the spinning and weaving, Sarah has caught on quickly. She keeps a drop spindle tucked in her belt while she is out with the sheep, just like the Andean sheepherders do, and she has even learned to spin while walking as they do. In fact, she learned so fast that it became necessary for me to teach her backstrap weaving like the Andeans too. I provided her with one of my backstrap looms, and we learned the warping together while we watched the Laverne Waddington method in the tiny house. Her first backstrap project went quickly, and she kept up with making belts for her family. Gradually adding skills—so capable and inspired—she is now additionally weaving balanced weave on a rigid heddle loom, the first loom I learned from: the Ashford Knitter’s Loom. These are just more feathers in her cap of textile possibility.

But when she doesn’t have time to spare to come over from the sheepfold (being a homeschooling mom aside from shepherding), I decided to create a new category on my blog dedicated to showing her the necessary steps so that she can continue to learn at her home. Introducing “Notes for Sarah” which is devoted to teaching her virtually and creating and sharing a regional fiber heritage right there on the mountain ridge, passing down the slow art of spinning wool and weaving cloth, and designing our own artful woven wear. As always, it is also just a place to document and share my enthusiasm with the larger textile audience, from this far corner of the world.


Our very first project in this series is a simple summer poncho top, made specially for her to wear during these hot mountain days, and I wanted to create something approachable for a narrow panel loom that requires minimal shaping, and no cutting. We’ve been contemplating a most primitive and simple top that can be made on the Knitter’s Loom, and we have found just the thing—which is structurally very similar to a short, fringed Andean unku, and I couldn’t help myself to make one for her first, as breadcrumbs to draw her into the siren’s call of handwoven clothing!

Please note that the pattern and instructional concept are entirely the creative property of Fran Caselli. I followed her generous YouTube tutorial to create this piece. I very much admire her teaching, and I hope you visit her  Fran Caselli Community Design Hub to see her beautiful and inspiring work!


♣   Notes for Sarah  ♣

Sarah, let me give you the most important note of all; that is to make a test swatch if you can, so that you can cut it off the loom, wash and dry it, then measure the epi (ends per inch, or threads per inch) of the finished preshrunk sample, then factor that in as your bottom line. I did this (there is a photo of my swatch in the gallery below) and yet, when following Fran’s instructions on her YouTube video, my brain apparently hiccupped. That is, I calculated her measurements as on the loom, not doing the math required to make use of the swatch, and calculate the number of ends needed to make the measurements for the finished piece. As a result, in my embarrassment, the “Fran Blusa” is much smaller than I wanted it to be, by several inches! Due to the fact, I haven’t washed and dried it like I did the swatch for then it would have shrunk even more (it will need handwashing I’m afraid). Always factor in percentage for take-up, loom waste, and most importantly — finished shrinkage — which can be around 30%.

My only defense really, is that this is the first time I ever wove a thing that is to be clothing and must be a “correct” finished size, as my weaving thus far has always been for scarves, and things that don’t need to be a particular measurement. Had I measured my swatch epi, I would have realized, but I made the swatch, then disregarded it. Making clothing from weaving is essential to make test swatch. In closing, the whole notes below are minimized as a result of my horrific miscalculation they were rendered somewhat useless.

  • Yarn: I used Berrocco Splash, 131y/120m = 50g, 70% Viscose, 30% Organic Cotton, DK, in “Laguna”. Fran’s instructions call for a similar DK yarn.
  • Loom: Rigid heddle loom, 30cm/12″ or wider (shown in this project is my Ashford 16″ rigid heddle loom.)
  • Warp:  Easy direct warp method for rigid heddle, 1 end in hole and 1 end in slot.
  • Reed: 7.5 dent rigid heddle reed
  • Width in reed: 30cm/12″
  • Finished: Fran Caselli’s instructions in her video show instruction for the Andean Braids, and also there is a video from her channel devoted just for Andean braid. (( note: although the Andean Braid looks really beautiful, I ended up going with my default fringe; the cable twisted, which I will show you in person)).

Rug No.2

It has come. The summer in its scorching moods and light saturated glaring afternoons, where the heat is reason to be out in the early mornings just to get a breath of fresh air, to water the plants, fill the birdbaths, and take Juno for a scamper. Then it is back inside, to stay busy beneath the posts and beams of the house, sheltering in. The solstice has already long passed, the days are shortening already, at a dizzying rate, it will soon be Autumn again, and each year older I become, the pages of my calendar flip faster than I can write anything down… the days, near empty boxes on pages turning… and my blog goes quiet for weeks upon weeks now. My focus has been elsewhere, and for a long time. I feel this morning though, as I have woken not only to a new day, but a new clarity, a new trust in myself.

In the new year I put together the Brooklyn 4-shaft table loom, and I finally began to weave very fine narrow cloth, satisfying a craving that goes beyond reason, lost to its gravitational pull, I was sure it was me married to fine linen weaving for the rest of time (Cloth No.4) . Even though everything, and in all directions, is part of the creative experience, adventuring so far out in one direction, before recentering and then again drifting off in another direction, like a pendulum. I wonder, is this the way of the artist? I am longing for a mid-summer reset at center. I confess, there are times I’m just too embarrassed to post about yet another diversion, that I have become more quiet, unsure of my impulses, I seek the stillness, worried that as soon as I put it into words, the words already begin to change inwardly.

Soon we will (finally) be putting in the finish floor for our rebuilt home (but not too soon, hopes Juno), and in a bit of anticipatory celebration I have decided to weave rugs. Lots of them? Reminiscing in the archives to November of 2024, I had recently woven my first sakiori from torn cloth, and then completed my first floor rug, feeling certain these were to be the first of a huge series where I would refine my technique. But I had not woven another until now. Reconstructing worn clothes into bit of improvisational rag weaving of sakiori cloth and rugs, while at the same time weaving fine cloth requiring intense focus, should keep me on my toes for the remainder of the summer!

♣   Weaving Notes  ♣

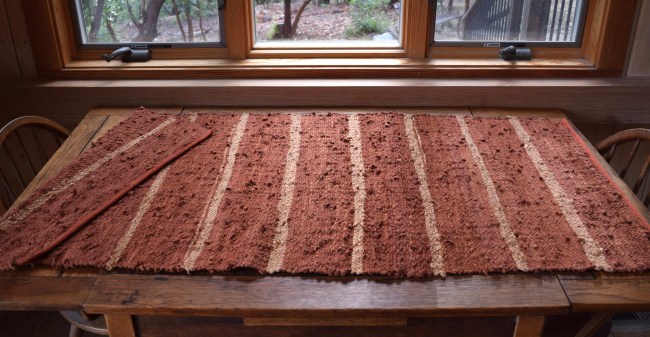
I wove a third of the rug with no particular pattern in mind but to make stripes, which I think was maybe a bit cliche. I did however, make intentional “mistakes”, laying down a few colors out of sequence, and making some stripes fatter than others, going for that folk art appearance. The effect was perfectly achieved when the faded areas of the fabrics, from drying on the clothes line inside-out in the sun, over time create a variegation of color, sought-after in folk textiles.

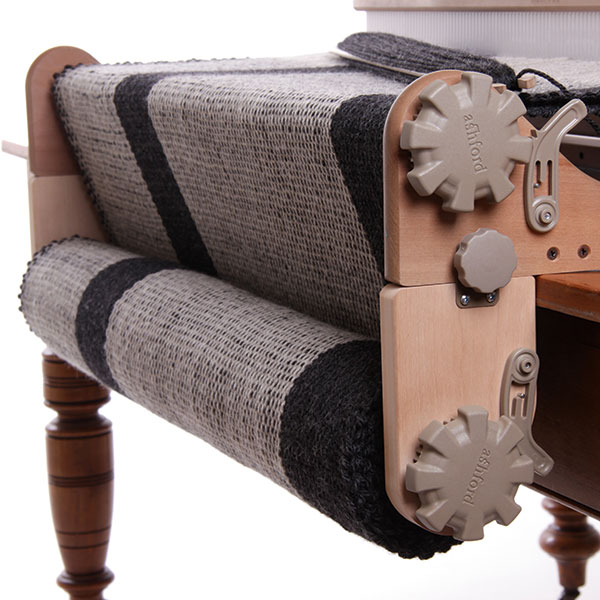
Oh, and it is definitely worth mentioning that weaving a rug on a rigid heddle loom needs a bit of specialized extras — specifically a weighted beater to really pack down the weft (the plastic reed is only to change sheds, not to beat anything) , and in my opinion the Ashford Freedom Roller is essential for the bulk that builds up in no time on the cloth beam.

The actual weaving notes are minimal for this project, as I was improvising through the whole thing, and not taking notes. Here is what I remember…

  • Yarn: Warp: 8/4 cotton warp yarn from Maurice Brassard, in color Rouille. Weft: Linen strips cut from many pairs of 100% linen pants, ranging from 1/2″ to 1-1/2″ , creating a thick-and-thin appearance, from spiral cutting up from the hem of the legs, over side seams and patches, going with the rustic nubby effect.
  • Loom: Ashford 32″ Rigid Heddle Loom with Freedom Roller attachment.
  • Warping method:  Direct warp method, double threading from back apron rod, through front to peg = 110″ , which was a rough guess to be more than long enough to use up all the terracotta linen strips. Wound on to back beam and finally threaded 1 in each hole and 1 in each slot. Tied off on to front apron rod for weaving.
  • Number of warp ends: Approx 182
  • Reed: 12.5 dent, but threaded every other hole/slot to create 6.25 dents per inch.
  • Width in reed: approx. 29″
  • Selvedges: Used a temple to keep width in reed.
  • Finished:  I didn’t want fringes, so I planned to hem. Wove the first and last 2″ woven in warp thread, packed down with weighted beater created weft-faced, stitched a rolled hem. I should have woven first 3 inches and packed down tight with weighted beater like I had at the last 2″. Measures 29″ wide by 66″ long unwashed.
  • What I will do differently next time: Cut the strips 1″ consistently, weave the warp thread header longer and pack down with fork for a tightly woven rolled hem. I will make a very minimal weavers angle when laying in the weft, for fear I was too dramatic with this one. Also, I really think for linen rags, I would like to use linen warp.

Cloth No.4

I have finally cut the linen off the loom and it is free, warp and weft married for the rest of time, and never to be unraveled. There is something sure and permanent about a well and densely woven piece of linen cloth, that it would tear before it would unravel, it would compost into soil before the weft and warp let go of each other.

My goofy mistakes presented themselves as I thought I was focused and yet I ended up at the beginning having to improvise through a lot of chaos in spite of my focus. There were a lot of things I should have done differently in this weaving; the most important being that I set up the warp very dense at 32 epi (warp threads per inch) and since the warp ends were so close together, the weft didn’t weave in a balanced way, the sure sign is that it is nearly half that. Next time when weaving this linen with 32 epi should weave twill structure I think, or if I continue to do plain weave, beat harder with the weft… looking for that sweet spot.

I learned also that it would have been great had I made a piece half this length, surely I could have a nice linen scarf, or something nice to wrap bread in out of the oven, and not invested so much time and expensive linen on a less-than-optimal sett. My new rule: Weave a small piece until I’ve got it perfect, THEN weave the yards-long cloth.

♣   Weaving Notes  ♣

I had already threaded the heddles starting at one end of the reed, planning to fill every dent, so the fact that I forgot to leave a couple of dents for the floating selvedge made it a challenge. One end had an intentional floating selvedge, threaded second, which is not wound on to the warp beam and the length of the thread winds around a bobbin and hangs off the back of the table through the weaving. The other side, as I forgot to make the floating selvedge first, I had to improvise an after-thought method, and I can’t remember what I did exactly, but may have cut off two texsolve heddles to free up two threads wound on to the warp beam with the rest of the threads, and to tension the after-thought floating selvedge threads — as they were not making the trip up and down with the rest of the threads in the harnesses — the slack would increase without the take-up, so I weighted it also with a bobbin and tied to the thread so it could move as the warp progressed forward. I also figured this was a happy mistake, for as a couple of other threads loosened along the way, well they got the bobbin trick hanging off the back too.

  • Yarn: Linen 14 from Silk City Fibers (7000 yards per pound) in Cream.
  • Loom: Ashford 16″ Brooklyn 4 shaft Table Loom, straight draw threading for plain weave, lifting pairs of odds & evens (1 & 3 , and 2 & 4)
  • Warping method:  Direct warp method, double threading from back apron rod, through front to peg. Wound on to back beam and finally sleyed through reed, threaded the heddles, and tied off on to front apron rod for weaving.
  • Number of warp ends: Again, I forgot to take these critical notes, so distracted by improvising through warp patterning.
  • Reed: 16 dent
  • Sley pattern: 2 ends in each dent
  • Threading pattern: 1 end in each heddle, but for the windowpane texture threaded 2 ends in a heddle.
  • Width in reed: approx. 15.5″
  • Sett on loom: 32epi
  • Selvedges: Floating selvedges , 2 ends each side. Used a temple to keep width in reed.
  • Sett after finishing: Warp 34 epi, and weft 18 ppi
  • Texture Pattern for Warp:  This was an exercise in making mistakes, so no need to put the pattern down as it ended up being crazy different. I had intended to have very subtle window panes, with only 2 ends in a dent. That was at least a good technique, but next time I will do four ( if I am to continue with direct warping, it must be even numbers per dent.)
  • Texture Pattern for Weft: I repeated the same measured distance between window panes as was in the warp, and because the window pane spacing in the warp was messed up badly, I repeated the sequence. In becoming a repeated mistake, in a way , makes it intentional and random at the same time! I ponder this method as something I may want to repeat, for it was at least not too repetitive.
  • Finished:  Ends woven in bamboo 8/2, makes a nice tight hold, so I could leave raw edge, with no hem. Washed and half dried in machine, then steam pressed, measuring 156″, or 4.33 yards long and 15” wide, and weighs 247g. 
  • Yardage:  Total yardage used for finished piece = approx 3812y, figured from weight of finished piece and not including loom waste. Note: it appears this project used half the 1.1 lb cone, so a single cone could in theory, weave double this yardage, probably 8 yards, or double the width, 31″ in the reed, with the same 32epi.