Three-in-One Swatching ~~~ A tutorial from Tips From The Table

click image to enlarge detail
Three-in-one, two-in-one, or four or more -in-one swatching. It doesn’t really matter, the title ‘three-in-one’ is rather metaphorical, illustrating many at once. However many you would like to test swatch for needle size, now is the time to just go for it, and gather up those needles.
This swatching technique is sadly only effective for those who are knitting their project using circular needles and knitting in-the-round . Also, this swatching technique will render the yarn unusable afterword for anything other than archiving in your swatch library (or for lining some bird’s nest) , as you will be cutting the pieces apart from each other (necessary to get proper row gauge) ~~ so have extra yarn on hand just for the swatching.
Why only for projects knitted in-the-round? Because the swatching is done in-the-round, not ‘flat’ (back and forth) , so it will only be an effective swatch for a project knitted in-the-round (that’s the rules babe)… 🙂
Why only circular needles? I don’t mean to be at all elitist, just that it really only works no-fuss with circular needles, and I can’t really think of doing this with double-pointed-needles (dpn’s) without screwing up, but, if you insist on trying with dpn’s, go right ahead and follow your dpn’s instincts with this and modify accordingly (and may the swatch angels watch over you).
You can make swatches as large and elaborate as you like, with garter stitch borders, or as simple and small as you like ~~ just as you would otherwise if knitting them individually.
If you’re wanting to just sample a new yarn for instance, well, yarn labels always have 2 or 3 needle sizes for the gauge, now you can just swatch all suggested needle sizes at one time !
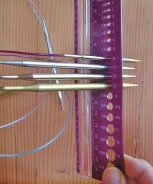
Lets Begin ! First of all, gather up your circular needles ~~ the very needles you will use for the project, yes, even if it is a 16″ long or 40″ long circular ~~ and use these to swatch with.

click image to enlarge detail
Now, choose another size you would like to test, assuming worst-case-scenario is that you don’t get correct gauge with the ones you expect to. For example, if your project calls for size US 7 – 4.5mm needles, and you knit kind of loose or tight, or just right, but you’re substituting yarn or whatever, then why not gather up one or two other needles to knit in tandem with the ONE. That is, for example, also a US 6 – 4mm as well as a US 8 -5mm needle. Or if you just want to keep it simple, choose another size you’re pretty sure might be a helpful option. Measure with needle gauge to make sure. . .
click image to enlarge detail
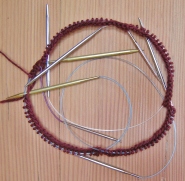
1. Casting-on: With yarn and size run of 2 to 4 circular needles in front of you , determine how many stitches to cast on, giving each needle 20 to 30 stitches, and cast on to each needle in sequence without putting down yarn. (if you wish to add extra stitches for a garter stitch border, factor those stitches in to total. ) Join to knit in-the-round and place round end marker .
click image to enlarge detail
While you’re at it, with safety pins or detachable markers, mark each swatch on cast-on edge so that you will know which is which when they are off the needles (like , 1 pin for smallest, 2 pins for next size, etc).

click image to enlarge detail
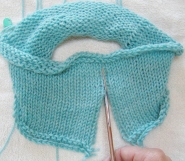
2. Knitting : You may decide to work only two, or maybe 4 or 5 swatches all at once, but for the sake of example, lets say you have 3 needles and 3 swatches going in the round, beginning with biggest ” Needle 1″, next smaller “Needle 2” , last smallest “Needle 3” :
With the first tip of Needle 1 in left hand, reach around with other hand hand and pick up other tip of Needle 1, then work stitches on Needle 1 with both of it’s tips. When you come to the end of Needle 1, drop the tip and work all stitches on Needle 2 & Needle 3 the same way. You will be finished with first round , then slip the end-of-round marker and proceed on to the next round. Work for as many rounds as you would individual swatches (ultimately same measurement roughly as width). Bind off. I find it helpful to cut and draw yarn through last stitch on each needle.

click image to enlarge detail
You may choose to work pattern, or have garter stitch for first and last rounds, or just transition between needles with stockinette stitch.
‘Laddering’ with loose tension between needles is actually good in theis case, as it gives a better cutting line later.
It is always best to allow for more stitches than you plan on counting to average over-all ~~ most accurate stitch gauges have more stitches (ultimately over 4″ across so that you can measure 4″ of body to average).
Don’t forget row gauge counts too, so you’ll want to knit as many rounds ‘rows’ as gives you an accurate average over 2 or more inches.
3. Soak & Cut: It is the same as steeking, but you needn’t fuss with all the securing stitches in place as with sewing a line on the machine or crocheting to the side, unless you really want to. Afterall, it is only a test swatch. But, you may like to keep them archived with nice edges, so you can fuss with them as much as you like, just so long as it doesn’t affect the stitch gauge. After you have bound off all stitches, give your hoop of swatches a nice soak , the very same way you would the garment you are going to knit. and rinse, and towel out excess water.
When damp, you can cut and separate your swatches by cutting the ‘ladders’ between the stitches which bridge the swatches. With each swatch, on a drying towel, shape minimally and let dry flat. If steam-blocking in addition is what you plan on doing for your project, then that is what you need to do for your swatches.
click images to enlarge detail


4. Label, Measure, Write: When your swatches are dry, you’ll notice they are actually different dimensions ! Magic !!!

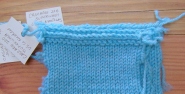
First, label each swatch and write the yarn used, and needle size. Measure as you would any swatch. (( pin, measure 4″ , pin, count stitches between pins, including half stitches)) . Take note of gauge on label. Don’t bother trying to make a round number just use accuracy… you can round later if needed. Chances are, one of your swatches will have a perfectly even number . . .

click images to enlarge detail


Any Questions ???
What if I accidentally choose the end of the wrong needle? Don’t worry, you’ll know when you chose the wrong end, the needle will suddenly fall out from beneath you, and in shock you’ll realize what just happened. No worries. Pick up the needle on the floor, and with it, unknit previous stitches back on to needle, grab the correct end this time, and continue. Don’t forget to laugh. 🙂
Can I mix up the types of needles, like one bamboo, another metal? No. You absolutely can not. They must all be the same type needle, in the same way you intend to knit your project. Different types of needles render different gauges , that is widely known. This tutorial is not about which type of material is best, only how to knit 2 or more swatches at once. It is the very same as if you were knitting individual swatches to test needle size for a project. All the same type & material needles.
If I cut the swatches to separate, won’t the cut-edges fray and unravel ? No, they won’t (whereas if you cut swatches knit vertically on top of each other, they would unravel.) The raw edges won’t look pretty, but if you leave them be, they’ll stay put just fine ( longer than long enough for you to measure).
Why bother ? Many reasons. If you’re like me, swatching is just something I’d rather wipe off the face of the earth, so this really does maximise the effort all around. If I am for instance, ‘pretty sure’ a size US 6 will be right, can’t hurt to be exactly sure , and swatch on US 5 and US 7 as well. Just to be thorough, which is not my forte. So I need shortcuts. This is a BIG shortcut in being really thorough.
In closing, I invite questions (which I will answer in comment reply, for all to see) in the comments of this tutorial, below. Thank you and Happy Knitting ! xx
~~ back to Tips From The Table ~~

This is pure genius! I’m definitely giving this a try the next time I have some swatching to do.
I like a bit of information and education – and it’s even better when it is entertaining, too. A great post. Very well written.
I love this! i never thought of doing this!